Ingredients
– 20-ounce can crushed pineapple (including juice)
– 21-ounce can strawberry pie filling
– 1 package white cake mix
– 1/2 cup salted butter (kept cold, sliced into thin pats)
– 1 cup shredded sweetened coconut
– 1 cup chopped walnuts
– 2 to 3 medium bananas
Instructions
1-First Step: Prepare Your Oven and Baking Dish Preheat your oven to 350°F. This temperature is crucial for achieving the perfect golden-brown topping while allowing the fruit filling to bubble and thicken properly. While the oven heats, grab a 9×13-inch baking dish. This size is important because it allows the ingredients to spread into an even layer that bakes consistently throughout. You don’t need to grease the pan for this recipe. The fruit filling provides enough moisture to prevent sticking, and the butter in the topping will release into the cake mix during baking.
2-Second Step: Create the Fruit Base Open your 20-ounce can of crushed pineapple and dump the entire contents, juice included, into your baking dish. Do not drain the pineapple because that juice is essential for proper cake texture. Spread the pineapple evenly across the bottom of the dish. Next, open your 21-ounce can of strawberry pie filling and spoon it over the pineapple layer. Use a spoon or spatula to distribute the pie filling evenly, creating a uniform fruit layer. The combination of pineapple and strawberry creates that classic banana split flavor profile while providing plenty of moisture for the cake mix to absorb.
3-Third Step: Add the Cake Mix Layer Take your package of white cake mix and sprinkle it evenly over the fruit layer. This is one of the most important steps in making dump cake recipes correctly. Pour the dry mix slowly and use your hand or a spoon to spread it into an even layer that covers all the fruit. Resist the urge to stir or mix the cake mix into the fruit! The beauty of a dump cake comes from the layers staying separate. As it bakes, the fruit juices will bubble up through the cake mix while the butter melts down through it, creating that signature texture where the top gets golden and slightly crisp while the bottom remains gooey and fruit-filled.
4-Fourth Step: Add Butter and Toppings Cut your cold butter into thin pats or slices. The butter needs to be cold so it melts slowly during baking, creating steam that helps the cake mix cook properly. Arrange the butter slices evenly across the top of the cake mix, making sure to cover the entire surface area. Don’t worry about perfection here; just aim for consistent spacing so every area gets some butter coverage. After arranging the butter, scatter your 1 cup of shredded sweetened coconut and 1 cup of chopped walnuts over the top. These ingredients will toast as the cake bakes, developing a beautiful golden color and adding wonderful texture to each bite.
5-Fifth Step: Bake to Golden Perfection Place your baking dish in the preheated 350°F oven and bake for 40 minutes. During this time, several magical transformations happen:* The fruit filling bubbles and thickens into a jam-like consistency* The butter melts and works its way through the cake mix, helping it bake into a tender cake layer* The coconut and walnuts toast to a beautiful golden brown* The edges become slightly caramelized and irresistible Keep an eye on your cake during the last 10 minutes of baking. If the coconut or walnuts are browning too quickly, you can loosely tent a piece of aluminum foil over the top. The cake is done when the topping is golden brown, the filling is bubbling at the edges, and the coconut and nuts are lightly toasted.
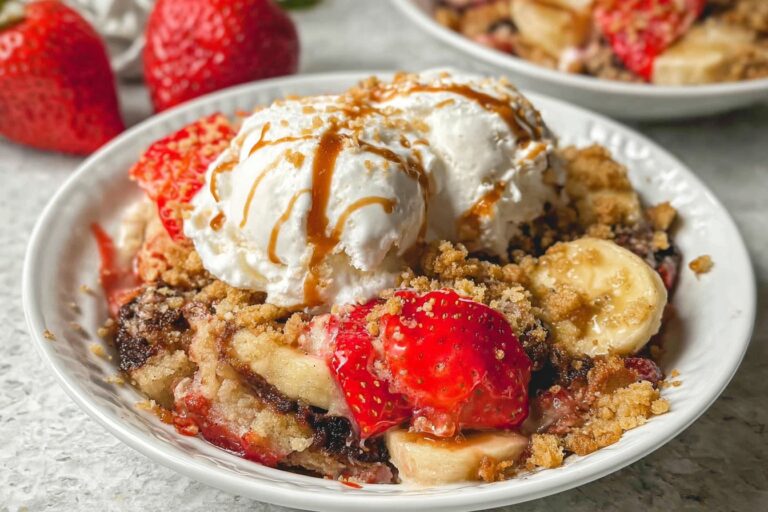
6-Sixth Step: Cool and Add Fresh Bananas Remove the cake from the oven and let it cool for at least 30 minutes before serving. This cooling time is essential because it allows the fruit filling to set slightly, making it easier to scoop and serve. The cake will still be warm and delicious, but it won’t be runny. While the cake cools, slice 2-3 medium bananas into thin rounds. If you’re concerned about browning, you can toss the banana slices in a little lemon juice before arranging them on top. This is especially helpful if you’re making the cake ahead for a party. If you love banana desserts, check out our classic banana cake recipe for another crowd-pleasing option.
7-Final Step: Serve with Your Favorite Toppings Arrange the banana slices over the top of the cooled cake and serve scoop-style directly from the baking dish. Each serving should include a generous portion of the fruit filling, cake topping, and toasted coconut-walnut mixture. Set out bowls of optional toppings like whipped cream, chocolate sauce, sprinkles, mini chocolate chips, and maraschino cherries so everyone can customize their serving. For the ultimate experience, serve each scoop with a dollop of homemade whipped cream and a drizzle of hot fudge.
Last Step:
Please leave a rating and comment letting us know how you liked this recipe! This helps our business to thrive and continue providing free, high-quality recipes for you.Notes
🧈 Use cold butter sliced super thin for even melt and crisp topping.
🍌 Add sliced bananas right before serving – lemon juice fights browning.
👀 Check at 35 minutes to toast nuts/coconut perfectly without burning.
- Prep Time: 10 minutes
- Cooling: 30 minutes
- Cook Time: 40 minutes
- Category: Dessert
- Method: Bake
- Cuisine: American
- Diet: Vegetarian
Nutrition
- Serving Size: 1/12th
- Calories: 438 kcal
- Sugar: 41g
- Sodium: 489mg
- Fat: 17g
- Saturated Fat: 7g
- Unsaturated Fat: 10g
- Trans Fat: 0.5g
- Carbohydrates: 66g
- Fiber: 3g
- Protein: 6g
- Cholesterol: 29mg