Ingredients
– 1 rotating turntable (lazy susan), approximately 14 inches in diameter for the base
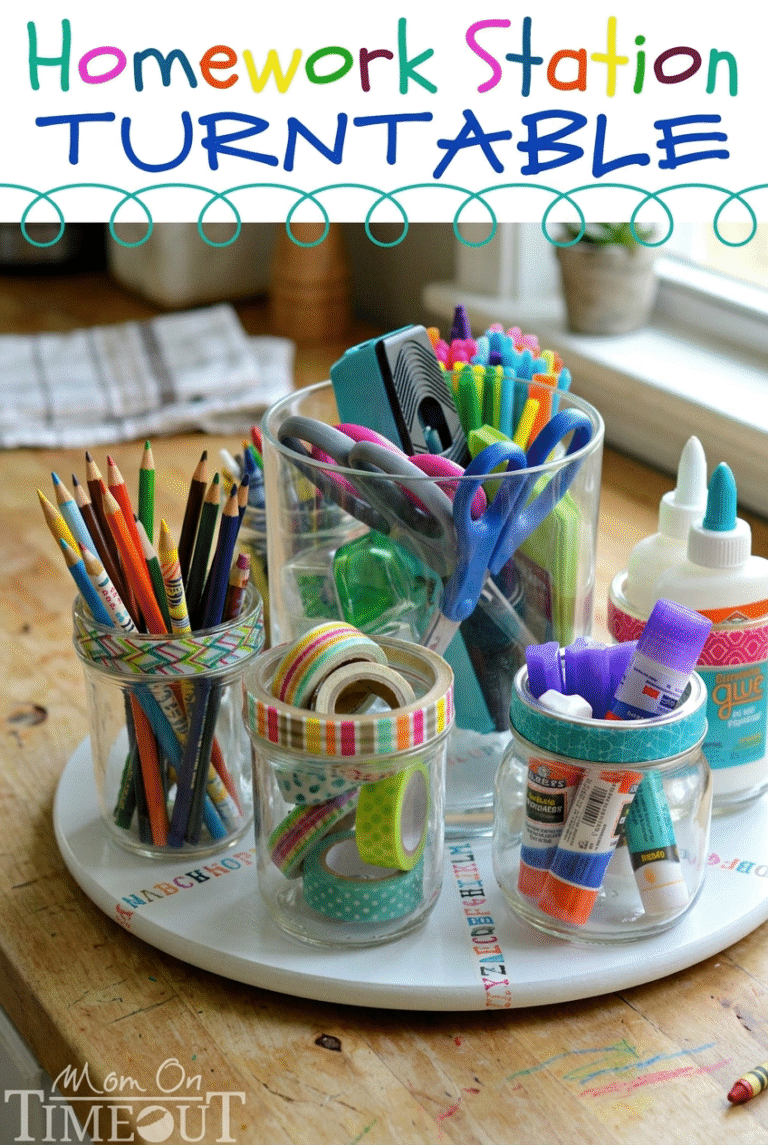
– 6 glass mason jars in assorted sizes for holding various items like pencils and glue
– 1 cylindrical plastic container or large jar for central storage
– 1 pair of scissors for trimming tapes and preparing materials during assembly
– 1 ruler for measuring sections accurately on the turntable
– 1 pencil for marking sections on the turntable
– Assorted washi tapes (e.g., blurred lines, cracked, pink quatrefoil, big zig, alphabet, feather patterns) for adding decorative flair and defining sections
– 8 fasteners rated for up to two pounds per inch for securing jars in place
– Assorted supplies like glue, pencils, pens, sticky notes, stapler, pipe cleaners, tape, ruler, crayons, and scissors for filling the jars
Instructions
1-First Step: Gather and Prepare Materials Begin by collecting all the items from your ingredients list and give the turntable surface and jar bottoms a quick wipe to make them clean and dry. This sets a solid foundation for everything else. Arranging your supplies ahead of time makes the whole process flow easier and keeps kids engaged if they’re helping out.
2-Second Step: Measure and Mark Sections Next, use your ruler and pencil to measure and mark six equal triangular sections on the turntable. This creates defined spots for your jars, making the turntable organizer more efficient. Double-check your marks to ensure they’re even, which helps with the overall balance of your homework station turntable.
3-Third Step: Add Decorative Tape Now, line those marks with washi tape to form the sections, trimming the edges for a neat finish. Using matching patterns across sections can make it look uniform and add a playful touch to your kids study space. This step is where you can get creative, turning a simple organizer into something kids will want to use every day.
4-Fourth Step: Position the Jars Place the jars along the outer edges of each section use three large and three small ones and put the cylindrical container in the center. This setup maximizes space on your turntable for kids homework area. Make sure everything fits comfortably to avoid any wobbling when it spins.
5-Fifth Step: Prepare the Jar Bands Remove the metal bands and lids from the mason jars, then discard the lids since you won’t need them. Wrap washi tape around the outside of each metal band, smoothing it down and trimming the ends for a clean look. This adds personalization and makes the homework station turntable more visually appealing.
6-Sixth Step: Cut and Attach Fasteners Cut the fasteners to fit the bottoms of the jars, ensuring they match the spots on the turntable. Attach one side of each fastener to the jar bottom and the other to the turntable, pressing firmly for a secure hold. These fasteners are crucial for keeping jars in place during rotation, enhancing the safety of your homework station.
7-Seventh Step: Secure All Items Fasten all the jars and the center container to the turntable, double-checking that everything is stable. This step prevents any slips or spills, especially when kids are spinning it quickly. Once secured, your turntable for kids homework area is almost ready for action.
8-Final Step: Stock and Place the Station Finally, fill the jars with your assorted supplies and position the whole unit in your homework zone. This makes it easy for kids to access items like glue or crayons during study time. With everything set, your homework station turntable is complete, promoting an organized kids study space that boosts focus and fun.
Last Step:
Please leave a rating and comment letting us know how you liked this recipe! This helps our business to thrive and continue providing free, high-quality recipes for you.Notes
🔒 Use strong fasteners to ensure jars stay secure during rotation, preventing slips or spills.
👐 The design allows jars to detach easily, encouraging kids to use and replace items independently.
🎨 Mix and match washi tape patterns on the bands for a playful and personalized customization.
- Prep Time: 30-45 minutes
- Cook Time: 0 minutes
- Category: DIY Crafts
- Method: Assembly
Nutrition
- Serving Size: 1 organizer
- Calories: 0
- Sugar: 0g
- Sodium: 0mg
- Fat: 0g
- Saturated Fat: 0g
- Unsaturated Fat: 0g
- Trans Fat: 0g
- Carbohydrates: 0g
- Fiber: 0g
- Protein: 0g
- Cholesterol: 0mg